Thursday, January 31, 2008
Standing alone
I didn't realise how much I would come to like this image when I took it. Usually, it's the other way around - I know that I will like the photo at the time I am taking it.
I did see what I have tried to portray in the title of this post. A solitary bloom, pushing its way skywards from a barren rocky mountain; blue water in the background, a coastline beyond that. I hoped that the contrast between the beautiful flower and the stark rock would make an interesting image.
But I was unsure of my ability to present all of that, and my first impression when I looked at the monitor on the camera confirmed my expectations. It wasn't until later when I looked at it on my computer that I felt that I had captured the potential that I saw.
I was able to make some adjustments to the original on the PC. I altered the format from portrait to landscape, and in so doing, I was able to crop some superfluous rock from the bottom of the image. This doesn't reduce the sense of contrast between the rock and the flower, but it does give more relevance to the background of the ocean and shore line. It also allowed me to straighten that shoreline, which in the original drops away on the left-hand side. A slight boost in the saturation of the water, and bingo!
TIP: Don't rely on your camera's monitor for final decisions on your images. Check them on your computer, and think of any possible editing enhancements first.
EXIF: Nikon D70; Nikkor 18-70mm DX; ISO 400; 1/500 sec; f11.
TFF
Wednesday, January 30, 2008
Memories
They say that a picture is worth a thousand words, and I have to agree with that sentiment. I also think that nothing jogs the memory like a picture can.
I took this picture in Europe in 1986. It was taken from a boat on the Rhine in Germany. Of course, I was using film in those days, as was everybody else - it was well and truly before the digital revolution. We were still using electric typewriters in the office that I worked in, not word processors. And we were sending faxes, not emails. Prehistoric, hey?
This photo was originally a transparency. Slides were great, because you could show them at many times their 35mm size by projecting them onto a screen. In 1986 I was in a camera club, and the hottest thing around was an audio-visual presentation where you synched two projectors and a tape recorder to show a collection of images to an audience, complete with music and/or commentary, fade-ins and other special effects. Bear in mind that this was even before PowerPoint, let alone some of the sophisticated multi-media software available now.
Anyway, the disadvantage of a collection of transparencies was that one had to set up a projector (usually at night, unless you had blackout curtains) in order to view the images. This was often more trouble than it was worth. Most slides sat around in yellow-topped Kodak boxes for years.
Now those old slides can be digitised so that they can be included in your digital library. I had this slide (and hundreds of others) scanned at a photo finishing store for a few cents per slide. But today's home scanners do a very good job. They are easy to operate and relatively cheap too. Some people I know have bought a scanner and converted all their anologue images to digital, then sold the scanner on eBay. This seems a very smart proposition for anyone with lots of images to convert.
EXIF: No idea!
TFF
Tuesday, January 29, 2008
Boys' toys
Here is a photograph of a store-front window.Whilst it was the contents of the window display that captured my attention initially, I then became interested in the pattern of the window pane itself.
Photographing something though glass is difficult. Dirty glass, reflections and refraction can present different issues for the photographer to overcome in the quest for the elusive image. If flash has to be used, that presents a further difficulty because the artificial light can reflect straight back into the camera.
I was lucky in this instance though. The window was perfectly clean, and the ambient light was fine - no flash needed. There were some internal lights on in the store, and I would need to position them so that they weren't obtrusive. The other challenges would be to get square to the window so that I could emphasise the wooden frames, and to get the exposure right to show off the boats in the display.
I like the way that the wooden window frames make the image look a little like a jigsaw, and of course the contents of the window are very interesting for most of the male species.
EXIF: Nikon D70; Nikkor 17-55mm DX; ISO 200; 1/1000 sec; f5.6.
TFF
Monday, January 28, 2008
Diane Arbus
Last weekend I saw the movie "Fur", starring Nicole Kidman. It is a fictional movie about the real photographer, Diane Arbus. Although a Kidman fan, I wasn't overly fussed with her work in this film, but Robert Downey Jr, who plays the fictional character "Lionel" in the film was very good, bringing a real depth to his part. I confess that I had some difficulty getting my head around the concept that the film was about a real person, but the events and some of the characters depicted in the movie were made up.
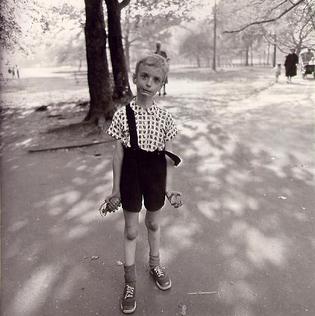
The real Diane Arbus was a portrait photographer from New York, who, although coming from a fairly privileged background, chose largely to take pictures of the marginalised and unfortunate. The picture above, reproduced from Wikipedia, is one of her most famous images, "Child with Toy Hand Grenade in Central Park, New York City". It is interesting to read the Wikipedia article, which attributes the look on this boy's face to his frustration at Arbus's deliberate futzing around while taking the picture. My wife, The Patient One, can identify with that sort of frustration!
It is also instructive to look at the image. The subject is obvious, although there are other elements in the picture. The boy's face and hand gestures are really the core of the photo, and although the boy has posed for the photo, his real personality has come through to the viewer as a result of the photographer's skill. The DOF is sufficiently narrow to isolate the boy against the background of the tree and person behind him, which, as often happens in a candid moment, are not placed ideally.
What we can learn from the image is that it is not sufficient just to pose a person for a portrait - the photographer has to be able to enable the viewer to see some aspect of the subject's character. I assume that Arbus didn't know the boy in this photo, and that makes it all the more remarkable that she was able to achieve this objective.
I love to look at the images made by other photographers. Just as artists study the works of famous painters, you can really develop your own skills by taking critical note of photographic masters and their work .
More about Diane Arbus here.
EXIF: Image copyright Diane Arbus; courtesy Wikipedia.
TFF
Friday, January 25, 2008
Still life
One of the most frequently painted subjects is the still life. Cezanne, Matisse and van Gogh all painted still life compositions at some time. The same is true of photographers, too - many photographers have fashioned a still life at one time or another.
I like still life photography for several reasons. As a photographer, you can learn about composition, lighting, colour, texture and creativity all at once. And your subjects will sit uncomplainingly for hours while you move, arrange and flash them to your heart's content. Try that with family members!
I had two main objects with this image. I wanted to show the etched glass bowl to its best effect, and I wanted some colour inside it. The colour part was pretty easy - after experimenting with different fruit I settled on the navel orange and the granny smith apple for their contrasting colours.
The glass proved to be somewhat more difficult. Front-on lighting pretty much destroyed the intricate leaf pattern on the glass. I knew that I would need some side-lighting to bring out the texture. But lighting from one side only proved ineffective, because of the shadows that formed. I ended up with cross-lighting - two flashes at 45 degrees to the line from camera to subject; one on each side of the fruit; placed so that no light would spill into the lens.
I also included a third light at the top of the fruit to help with the three-dimensional modelling I wanted for the fruit. Fortunately for today's photographer, the most recent flashes are pretty smart. The Nikon system will wirelessly fire several flashes at once from the camera's pop-up internal flash, and calculate the necessary flash duration for your exposure at the same time. No calculations, no cables - couldn't be more straight-forward.
EXIF: Nikon D200; Nikkor 17-55mm DX; ISO 320; 1/250 sec; F4.
TFF
Thursday, January 24, 2008
Black Swamp wetlands
Today I visited the Black Swamp wetlands on the edge of Moreton Bay at Cleveland. This wetlands is amazingly situated on the edge of a busy shopping centre on a main road. The Black Swamp wetlands has now been recognised by the local Redlands Council as an area of environmental significance, as it contains a diverse range of flora and fauna. It has plenty of melaleuca (paperbark) and eucalyptus (gum) trees and is a haven for flying foxes and birds too.
This is the Australian White Ibis (above) sitting in a paperbark. These birds are fairly big, around 75cm in length, and unfortunately human behaviour has turned them into pests. They scrounge amongst the rubbish tips and even city garbage bins for food scraps.
And here we have a pair of Royal Spoonbills sitting on a nest. Their bill is a large spatula-like instrument that they use to stir up worms and grubs as they wade in the shallow water of the wetlands. The yellowish patch on the neck area of the birds appears during breeding.
EXIF: TOP - Nikon D200; Nikkor 80-400mm VR; ISO 200; 1/250 sec; f8.
BOTTOM - Nikon D200; Nikkor 80-400mm VR; ISO 400; 1/250 sec; f8.
TFF
Wednesday, January 23, 2008
Port supervisor
Seagulls are so used to humans that they often let you come quite close to them. Perhaps they just want to check out whether you are carrying chips!
This seagull, perched on a post overlooking Melbourne's Southbank area, right on the Yarra River, seemed to be totally comfortable with the waterfront environment to the degree that he could have been controlling the whole show. Judging by the "deposits" on the post, this was a regular observation post where he could supervise to his heart's content.
There was no problem getting close enough to take the photograph. I wanted to ensure that I captured his dominance of the area, with the boats, cargo and people in the image, but secondary to the main subject, the gull. Because I was close, I knew that if I focused on the seagull, there would be quite narrow DOF (depth of field) in the picture anyway.
Later, in post-processing, I darkened the whole image except for the gull, and this further emphasises the gull as the dominant component of the photograph, even though it is placed on the edge of the image. Too close, actually, because I have clipped off a tiny portion of the tail. Annoying!
Apart from that minor fault, I am quite satisfied with the final outcome. The bird is sharp and bright, and the out of focus and darkened background is still recognisable as a waterfront environment. The gulls forward and elevated position portrays the "port supervisor" attitude that I wanted to present.
EXIF: Nikon D70; Nikkor 18-70mm DX; ISO 200; 1/100 sec; f11.
TFF
Tuesday, January 22, 2008
Nature photography
Being a professional photographer could be a very difficult occupation, I reckon. Because it is my hobby and I love it (I'm truly an amateur) I often think about the life of a pro 'tog. There are all types, because there are so many genres. I have mentioned sports before, and I used to daydream about following cricket all over the world as a photographer. Actually, that was probably right after I used to daydream about travelling the world playing cricket! And of course, the fashion photographers who get paid obscene amounts of money just to take pictures of pretty girls. Food photographers, wedding photographers, studio photographers, school photographers (the kids, not the buildings!) and so on. Not to mention the dreaded paparazzi who have made celebrity spotting a spectator sport. I bet they all have their difficulties.
But surely, one of the most problematic would be the nature photographer. The requirement of having the utmost patience would probably rule me out immediately. Then there would be the issue of working around fierce animals and things that would want to eat you, or at least take a big bite out of you. Even a little bite! Not to mention the sun, the wind, the rain and snow... you get the picture. (Sorry about the awful pun!)
I thought a lot about this when I visited Kruger National Park in southern Africa in 2006. Of course, I was looking forward to making images of animals in the wild, and the trip surely lived up to my expectations. But not without some problems that I had not foreseen.
The first one was that I had not considered that animals don't want to get their picture taken. Well, it's not that, exactly - they just don't want to be around humans, and who could blame them. So whilst animals were plentiful where we were, they had the annoying habit of wanting to leave an area just as I turned up. Result - lots of images of animals' bums, as the beasts tried to get away as quickly as possible.
The next problem was that, even when they deigned to hang around, animals have no idea about working with a photographer. They move behind bushes, or they carefully arrange for their face to be obscured by a branch. They even close their eyes at times! Photographing kids would be bliss by comparison!
TIPS: Be prepared for a lower than usual percentage of keepers. Learn to be really quiet. Try to be absolutely still and really, really patient. Above all, really enjoy yourself.
Nothing beats the splendour of seeing some of nature's most spectacular wildlife in their natural environment. Awesome is a very over-used word, but being close enough to a wild animal to take an image like this one of the giraffe is nothing short of awesome.
EXIF: Nikon D70; Nikkor 80-400mm VR; ISO 200; 1/400 sec; f6.3.
TFF
Monday, January 21, 2008
Local neighbourhood
After a certain length of time, we humans close our eyes to our surrounds. Or, at least, we fail to see things because we are so used to seeing them. Familiarity breeds contempt, as they say.
Every now and then, I grab my camera and tour my local neighbourhood. I have a fairly large folder of images that I have taken over time in this way. By switching on my photographer's brain, I get to see things that I haven't previously noticed. Or, I see things differently from the way I have seen them before.
My local bakery parks an old bicycle outside the entrance. One day, I asked them if I could photograph the bike, and they were only to happy to let me do that. This photograph is the result.
I bet I've walked or driven past that bike hundreds of times without giving it a second thought, and yet is unique enough, with its bright yellow colour (even the tyres!) and cane basket to justify being photographed.
EXIF: D70; Nikkor 12-24mm DX; ISO 200; 1/160; f14
TFF
Friday, January 18, 2008
Around home
Sometimes I give myself a photographic assignment, just as a means of firing up the photographic juices. For a couple of weeks I had the challenge "Colour", and I was looking for abstract ways to represent colour - the brighter the better. And the more colours, the better too!
It's surprising what you can come up with if you are prepared to think as laterally as you are able. Lots of everyday household items are pretty colourful, as I discovered. Think clothes pegs, table napkins and pantry contents for starters.
But when I was sitting at my desk, I reached into a drawer to get the stapler when the paper clips caught my eye. The ones I have at the moment are not the plain vanilla chrome-coloured ones, but these multi-coloured specimens covered in spots. Perfect!
It hardly took a moment to take them out of the drawer and set them up for a photograph. As always in photography, it's the lighting that is paramount in making an image. I lit this photograph with a single off-camera flash, and I had the clips in a white plastic box to reflect the light. The resultant picture is a wild mass of bright colours that suited my self-imposed challenge topic to a T.
EXIF: Nikon D200; Micro-Nikkor 105mm; ISO 100; 1/125 sec; f8.
TFF
Thursday, January 17, 2008
Snow
There's no snow where I live. Summer is hot and humid. For two or three months, it's unbearably humid, with temperatures to about 40 degrees Celcius. Winter temperatures might get down to about 5 degrees. As far as seasons go, that's pretty much it. No spring - not really. No autumn - no colour changes, no leaves falling.
So to travel to a different climate brings new photographic challenges. Snow, for example. Snow can be difficult to photograph, particularly when it is in large quantities in the scene that you are capturing. In the picture above, of a fire hydrant in Chicago, there is a relatively small amount of snow. Where it is a larger portion of the scene, you need to be careful that your camera's meter isn't fooled into thinking that the scene is too bright and that it should reduce the exposure.
The problem is that light meters are programmed to average a scene's exposure at middle grey. When the scene is predominately white, as in this snow scene below, the camera thinks that it should be grey. The photo on the left was taken at the meter's reading of the scene, and you can see that it is clearly underexposed, with the white snow rendered grey as a result.
To produce white snow, the exposure must be increased. Most cameras have an adjustment called exposure compensation that lets you increase or decrease the
exposure from the one that the meter suggests. For scenes like this, there are a couple of things to remember. Firstly, use your camera's play-back function to check how the image looks on the LCD. If it looks underexposed, dial in some positive exposure compensation. In a situation where it appears to be overexposed, then a negative adjustment is called for.
Secondly, bracket your exposures. Take a few exposures with different levels of positive and negative compensation. This allows you the option of choosing the best one later.
EXIF (main image): Nikon D70; Nikkor 17-55mm DX; ISO 200; 1/400 sec; f2.8
Wednesday, January 16, 2008
Patterns
Photographs usually have people, animals or objects as their subjects. But that shouldn't limit photographers in their quest for images.
Good photographers can also portray ideas and emotions with their pictures. Concepts such as light and texture are critical components in the making of good images, and can actually be subjects in themselves.
One of our strongest visual traits is the ability to recognise patterns and to find them pleasing to the eye. Patterns are often found in nature - think of ferns, leaves and flowers for a start. And, of course, we use patterns frequently in architecture and design.
The picture above is all about the pattern of the seats and the contrast between their red colour and the snow on the ground. A very simple concept becomes quite a powerful image. The seats are in the outdoor section of the Jay Pritzker Pavilion in Millennium Park, Chicago.
EXIF: Nikon D70; Nikon 17-55mm DX; 1/250 sec; f8
TFF
Tuesday, January 15, 2008
Keep your camera handy!
One of the golden rules of photography is that you should have your camera ready for action and with you as much as possible. As well as shots that you deliberate over and plan to the nth degree, there will also be situations that are completely unscheduled and not anticipated. There is nothing worse than seeing a great picture appear in front of you when you have no way of recording it.
This image is the result of a complete coincidence, and although I was on my early morning walk, I had the foresight to have brought my camera with me. Sometimes it's not practical, say when it's raining, but I often take a compact camera with me when I walk or ride my bicycle.
This picture was taken not far from my home and quite close to the river. Hot air balloons often float past above the river because of the prevailing breezes.
So this particular morning, as I was approaching home at the end of my walk, a number of balloons drifted by. The balloon in the photograph has a big green frog on it and I really wanted a picture of it.
I didn't have too long to wait before I could frame the balloon in an interesting position near an old woolstore, now an apartment block, with a very blue sky background.
TFF
Monday, January 14, 2008
Which images to keep?
In the days of film cameras, photographers (particularly amateurs) had to be pretty miserly with their shooting habits. Film was expensive to buy and process.
Now that we are well into the era of digital imaging, photographers are finding that they can take many more images. Memory cards are getting bigger and cheaper on an almost daily basis, so many of us are extremely trigger-happy. What this does for our photographic ability is probably a topic for another day, but it certainly does present a question or two about which images to discard and which to keep.
I suppose the first criterion for determining which photographs to keep is the amount of storage you have. Like camera memory cards, external hard drives are also becoming larger and cheaper. So there is probably no real problem for most of us to keep as many images as we want.
The next factor to consider is the quality of the shot. I make sure that I immediately delete those images that are so badly exposed or so out of focus that they are not usable in any way at all. (Yes, I still have them! And so does any photographer who likes to experiment.) But beyond that, I tend to keep rather than discard. Why?
Well, there are a couple of reasons to keep images that are poorly composed or only mildly under- or over-exposed. Firstly, let me emphasise that, in my own case, I shoot RAW images. These are images that are not altered in the camera - no compression (JPEG files are compressed files), no colour enhancement, no sharpening. This allows me to keep "the negative" as it were, so that the original image can be used again and again.
One reason I do this is that technology changes. Another reason is that my ability to use technology also changes.
Let me illustrate by way of an example. We just had a wet weekend here, and they have been rather rare recently. But a wet weekend is a perfect time to browse through your old photos to see whether they can be improved.
Here is a picture I took three years ago. It wasn't good enough to use for anything at the time, but I kept the RAW file in my image library.
Since then though, a couple of things have happened.
Firstly, I started to use Adobe Photoshop CS3. Previously I was using Adobe Photoshop Elements, which is a very good piece of software. But Photoshop CS3 is far more sophisticated and can do so much more. And indeed, there is a learning curve involved. I bought and read some books (check out those by Scott Kelby at http://www.scottkelby.com/books.html ), and I also signed up for some free web seminars run by Adobe that were absolutely fantastic. Your local library probably has a selection of books on this topic too. I use my library quite often.
Anyway, I was browsing through my images recently when I came across this one and thought that it had potential for a make-over.
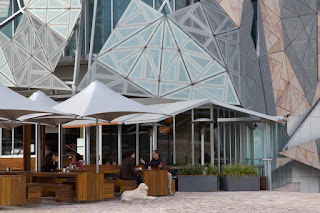
What I saw that needed improvement were the composition and the lighting. The point of interest should be the couple with the dog, and unfortunately I have them centred right in the middle of the image.
There is also too much extraneous material, so some judicious cropping was required.
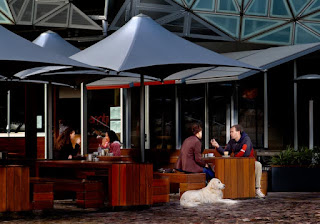
Here is my reworked image. I cropped away most of the architecture of the building above the cafe because it isn't essential to the photo I had in mind.
While doing that, I was able to position the couple with the dog somewhere more in keeping with the rule of thirds.
The image was too light though, and I needed to do something about that. The sails and the building above the cafe were darkened, as well as the timber tables in the cafe. By using a Layer Mask in Photoshop, I was able to prevent this darkening from applying to the couple and the dog, and the result makes them a much more prominent part of the image.
Unfortunately it is beyond the scope of this blog to give a step-by-step set of instructions. These are easily obtained in Scott Kelby's books (that's where I learned them!), and my intention with this blog is to show the possibilities and let you discover the process yourself.
So, by all means throw out those images that are readily recognised as being total failures.
But keep the rest. You might use them one day!
EXIF: Nikon D70; Nikkor 18-70mm; ISO 200; 1/50 sec; f11.
TFF
Friday, January 11, 2008
Compact cameras
I take the majority of my images with a DSLR camera. My choice is Nikon - largely a carry-over from the days of film when I had Nikon 35mm SLR cameras, and having some compatible lenses made the choice of a digital body fairly easy for me.
I have been interested in photography since I was a teenager. I bought my first SLR camera (a Pentax Spotmatic) in my twenties, my first Nikon SLR in my thirties and my first compact digital camera in my forties. It makes me wonder what sort of gear I'll be buying when I reach my nineties! (Still a long way off, btw!)
But I don't always use a DSLR camera. Sometimes it's not practical to carry a camera and a bag of flashes and lenses. On a trip to Europe a year ago, I knew I would be travelling in a relatively small vehicle with five other people and their luggage, so space would be a premium. I took a point-and-shoot digital camera and happily recorded the whole trip, including a wedding, and didn't miss a beat.
Sometimes people can be intimidated by a large camera and a long lens being stuck into their life. I try to be sensitive to other cultures, and whilst I like to take photographs of people in their own environment, I won't do so if I feel that it will annoy or embarrass them. Often in these circumstances, a simple camera is less intrusive than a DSLR, and less likely to cause offence.
But I have noticed a it of snobbery around cameras and photography in general. It seems that some people don't rate an image if they know it has not been taken with the latest and greatest (and most expensive) DSLR. Some people think that they will become a better photographer if they buy the newest and best gear. However, it's not about the equipment - it's all about the imagination and skill of the photographer.
Recently, my wife (hereinafter referred to as "The Patient One" or TPO) and I went to visit some friends in Thailand, which is where I took today's image. Part of the famous history of Thai silk is the American entrepreneur, Jim Thomson, who pioneered the industry in Thailand.
His house is now a major tourist venue in Bangkok, and a guided tour provides a terrific insight into the way he lived, Thai architecture and local customs.
Outside the house were these delightfully coloured water-filled pots, with Thai orchids of various stages of maturity floating on the top.
This photo was taken with a Point and Shoot camera, a Canon A620. I had this camera with me, rather than my DSLR, because I knew that I wouldn't need telephoto lenses or multiple flashes during this visit.
As you can see, it has done a perfectly adequate job for me. This model camera has a viewfinder as well as the LCD screen. I still find composition easier with a viewfinder, whereas TPO, who also uses this camera, would rather compose the shot using the LCD. The camera is a 7.2 megapixel model, and the only thing missing that I would prefer to see is the ability to produce RAW files. Some of the more recent models now have this feature.
EXIF: Canon A620; ISO 200; 1/60 sec; f3.5
TFF
Thursday, January 10, 2008
Golden Orb spider
At least, that's what I think this is! I'm certainly not an expert on spiders, but I looked it up.
Anyway, what's important is that this is the same spider in both images. The first image (left) was taken on 21 November 2007, and the second (below right) today, 10 January 2008.
Come to think of it, I can't be absolutely positive that it is the same spider. The web is certainly in the same place, and I have been able to observe it almost every day, so I think that it is the same spider.
The Golden Orb spins big webs in the flight path of insects. Obviously, the flight path around this web is fairly busy, because she (more about sex later!) has certainly grown in the past seven weeks. Captured prey are either eaten immediately, or can be saved for later by being wrapped in silk cocoons until needed. You can see some of this spider's larder in the background of the image on the right.
And this is how they do it. The image left shows this spider wrapping a bee for later consumption. This whole wrapping action was completed in only a couple of minutes, so they can certainly get that thread out quickly. This picture was taken on 12 December, or about half-way between the top two images.
I read that the females are larger than the males, and that they can grow up to 45mm in length. The males usually inhabit the same web, and I have seem a smaller spider scurrying around the web occasionally.
I am guessing that this female will soon be laying her eggs, which will be wrapped in silk and probably placed somewhere on the outer perimeter of the web. Her abdomen is looking fairly round now, instead of the more oblong shape of the earlier photos.
EXIF: Nikon D200; Micro Nikkor 105mm; various exposure combinations. All lit with Nikon's macro lighting setup, the R1C1.
TFF
Wednesday, January 9, 2008
Rainy days
I have had different feelings about rain. When I was younger, I hated the rain if it washed out my school sports day. But if it rained at night, I loved to hear the sound of it falling on our tin roof.
These days, water is precious, and lessening water supplies mean that we have to conserve water as much as possible. This means learning to do more with less water - such as selecting drought-proof plants, and possibly, showering with a friend. :-)
But for the avid photographer, rain is usually seen as a curse. Expensive cameras and lenses do not cope well with water, so shooting in the rain is perilous right from the start. Some photographers might feel that rain reduces your photographic opportunities, and in some instances this might well be the case. Group family photos outdoors, for example, are probably not a suitable photographic exercise when it is raining.
However, it would be a mistake to leave your camera in its case every time it rains. I have seen many good images, and some spectacular ones, that have been taken in the rain.
Raindrops add some interest to pictures of flowers; puddles show reflections of street and car lights; dark clouds make for moody landscapes. Colourful umbrellas are often photographic, and people huddled in overcoats or sheltering under newspapers are interesting candid subjects.
And if you are still not convinced, think about setting up a still life or a tabletop indoors.
TIP: Make sure that you keep some silica gel in your camera bag, and always wipe your camera and lenses when the shoot is finished. When the rain stops, it's a good idea to get your camera gear out into the dry conditions for a while to make sure that you don't get any mildew or fungus in your gear.
EXIF: Nikon D200; tripod; ISO 100; Micro Nikkor 105mm; 1/40 sec; f9.
TFF
Tuesday, January 8, 2008
Action photography
When I was a kid, sports were a big attraction for me. Cricket, basketball, football, tennis, squash - I played and enjoyed them all. So it was only natural for me to think of action photography when I first took up the camera. In fact, I guess I only thought of sports photography rather than action photography, as sport is really only a subsection of action.
It didn't take long to find out that action was much harder job as a photographer than as a participant!
My first camera was a Ricoh rangefinder camera, loaded with 35mm Kodachrome slide film. There was no instruction manual, so I was largely self-taught. In fact, I didn't even know about focusing until after I had my first roll of film developed and only one image was in focus. A quick trip to the camera shop to reload the camera with film and ask why my pictures were so terrible revealed that although the lens was fixed to the camera, the glass elements moved backwards and forwards when the focus ring around the lens was twisted. In the viewfinder, a very small triangle in the centre was the focus point, and the focus ring was turned until that triangle was in focus with the remainder of the viewfinder.
You can appreciate that my first attempts at action photography would have been abject failures when you consider that Kodachrome had a speed of 25 ASA (ISO), the camera focus system was slow and too small for quick focus, and the lens was a 35mm focal length unable to be changed!
Fortunately for all of us, these days even the most basic digital camera can handle speeds up to 800 ISO, with relatively quick auto-focus systems and fast shutter speeds.
But apart from equipment, the most important tool you need is a brain, because there are a number of things that you have to consider with any form of action photography. Let's consider a couple of points.
I will list shutter speed first, because to me, how you capture and represent action is principally dependent on this factor. The photographer has to decide whether to freeze action by using a fast shutter speed, or whether to allow some motion blur to occur with the selection of a slower shutter speed.
As an example of what I am talking about, have a look at this picture of the cyclists. I am not sure of their exact speed when I took this photo, but as a recreational cyclist I can say that it would have been in excess of 40 kph. Here I needed to select a shutter speed that was fast enough to show them clearly, but not so fast that the cyclists appear to be stationary.
The speed selected, 1/250 sec did the trick, because the spokes and the wheels of the bikes are blurred, suggesting rapid movement.
Aperture is not quite as important in this form of photography, as it will be dependent on the conditions, the shutter speed selected and the ISO. You do need to ensure, though, that the depth of field (DOF) will be sufficient for your requirements.
You will also need to learn a panning technique, as most action will involve moving subjects. You will have to develop a method of holding the camera firmly, elbows against your sides, and a rotation of the torso as you follow the action. Don't forget, squeeze the shutter; don't press it too firmly. The effect of panning enhances the representation of action, because it provides you with a sharp foreground and a blurred background. If you check the image above, you will see what I mean.
The last point I would ask you to consider is composition. Most action occurs quickly, so I would advise some pre-shoot thinking here to determine a viewpoint that will keep you close enough to the subject and that does not have any distracting elements in the shot, and the background is acceptable. And, as a general rule, when you have a moving subject, it's best to leave space in front of it for it to move into, rather than having the subject jammed against the frame.
EXIF: Nikon D70; Nikkor 70-200mm VR; ISO 200; 1/205; f8.
TFF
Monday, January 7, 2008
A calendar project
Do you have problems selecting Christmas presents for family and friends? It is a problem I have experienced, and it seems to be becoming a greater problem each year. After all, there are only so many pairs of socks.
For Christmas 2006, I decided that, rather than give impersonal gifts like underwear, chocolates or socks, I would prefer to give something more personal and more indicitive of an effort having been made on my part. I had, in the past, received gifts such as home-made preserves and jams that made me think that actually producing something from my own toil had merit.
And of course, being a photographer, what better than some of my photographic work? I thought about having a print framed or mounted for each person, but then you run the risk of coming up with a frame or mount that isn't suitable for their house, or isn't to their personal taste.
Then I thought about a wall calendar. This gives you an opportunity to show off twelve of your images (thirteen including a cover) and is something that most people actually need. I looked around on the web and found that there are many companies that offer photo-finishing services that include printing your images on mugs, calendars and even T-shirts.
Snapfish, by HP (http://www.snapfish.com.au/) have an attractive range of calendar templates, and the process is very straight-forward. You simply upload the images you want to use and place them in the appropriate month. The calendar can start from any month you like, but I suspect that most people would want one that started in January. The costs are reasonable, with price reductions if larger numbers are ordered.
But for Christmas 2007, I had almost the whole year to work out which images to use, and of course, I also had time to take some specifically for the calendar if I chose. Rather than limit myself to a specific theme, I decided instead to use an eclectic mix of images, hopefully as different in genre as possible, and make it a real photo showcase. I'll definitely be making another calendar for 2008, and I am starting my planning now.
Why don't you see if there is a photographic project that you can start now for Christmas gifts later this year?
For Christmas 2006, I decided that, rather than give impersonal gifts like underwear, chocolates or socks, I would prefer to give something more personal and more indicitive of an effort having been made on my part. I had, in the past, received gifts such as home-made preserves and jams that made me think that actually producing something from my own toil had merit.
And of course, being a photographer, what better than some of my photographic work? I thought about having a print framed or mounted for each person, but then you run the risk of coming up with a frame or mount that isn't suitable for their house, or isn't to their personal taste.
Then I thought about a wall calendar. This gives you an opportunity to show off twelve of your images (thirteen including a cover) and is something that most people actually need. I looked around on the web and found that there are many companies that offer photo-finishing services that include printing your images on mugs, calendars and even T-shirts.
Snapfish, by HP (http://www.snapfish.com.au/) have an attractive range of calendar templates, and the process is very straight-forward. You simply upload the images you want to use and place them in the appropriate month. The calendar can start from any month you like, but I suspect that most people would want one that started in January. The costs are reasonable, with price reductions if larger numbers are ordered.
So I ordered a number of calendars for Christmas 2006, and I was so pleased with the results and the feedback from the recipients that I repeated the process for Christmas 2007. For my first attempt, I used a number of animal images that I had taken in Africa in that year. This one is an example:
But for Christmas 2007, I had almost the whole year to work out which images to use, and of course, I also had time to take some specifically for the calendar if I chose. Rather than limit myself to a specific theme, I decided instead to use an eclectic mix of images, hopefully as different in genre as possible, and make it a real photo showcase. I'll definitely be making another calendar for 2008, and I am starting my planning now.
Why don't you see if there is a photographic project that you can start now for Christmas gifts later this year?
EXIF: Nikon D70; Nikkor 80-400mm VR; ISO 400; 1/160 sec; f5.6
TFFFriday, January 4, 2008
The grass whispers to me...
This image came about because I wanted to make a series of wallpapers for my desktop computer. My thoughts were that I would like to look at something relaxing when my screen wasn't occupied by spreadsheets, files and email.
So I started to think about the things that I found relaxing and peaceful. After a while, I recalled some really powerful and evocative memories of my childhood. Things like playing on a swing, or spinning around like a top until I fell over from dizziness. One particular memory was of just lying in the grass on a summer day, watching the clouds being blown across the sky by the wind. I could pull a stalk of grass and chew on it while trying to decipher the changing cloud-shapes. The grass was moving softly in the breeze, almost as if it was whispering some secret to me.
Wondering whether it would even be possible to recreate such a memory and feeling, I started to envisage how to set up the shot. Adult perspectives are very different from childhood ones, and I tried to picture myself lying somewhere on a grassy hill madly taking pictures in the hope that one would somehow magically recreate my childhood memory. It didn't seem practical, so I decided that I would have to go back to first principles and start again.
I thought that the sky wouldn't be such a problem providing I had a suitable day - blue sky, fluffy white clouds being blown about. I figured that if I kept the background sky out of focus the colours of the clouds and sky would work well. The grass was still something I was worried about. We are in the middle of a severe drought and lush green grass is somewhat difficult to find.
Finally, when I was watering our balcony pot plants on one of our scheduled watering days, I found myself looking at a pot of chives that my wife keeps as part of her herb garden. The breeze was indeed moving the stalks of the chives, and they were very green and quite tall and willowy.
I was able to put the pot of chives on the ledge of the balcony, and I got my camera and knelt down below the level of the pot so that I could shoot through the chives up into the sky. It was a lovely spring day, so the sky was a magnificent blue and the clouds were made to order.
After about a dozen shots, I felt that I might have the image that I had been mentally painting, and when I downloaded the files to the computer I was really happy. All I had to do was give the colours a touch more saturation, and crop the image to the 16X10 format that I wanted for my screen.
And the resultant picture is at the top of this post. I hope you like it.
EXIF: Nikon D200; Micro Nikkor 105mm; ISO 320; 1/250 sec; f14.
TFF
Thursday, January 3, 2008
Don't forget to crop!
Welcome to my musings on photography, images, camera gear and photographers.
As well as showing and discussing my own images, I hope from time to time to be able to discuss the work of others too.
My intention is to discuss images from different viewpoints and comment on how and why they was taken; their strengths and weaknesses; and how they could be improved technically and aesthetically. There will also be interesting photographic tips and news from the world of photography.
At left is an image of a bee on a flower that I took in a garden near where I live just before Christmas. I was using a Nikon D200 with a Micro Nikkor 105mm lens. Although I also used a macro lighting set-up, you can see that I badly misjudged the exposure.
What I want to do is discuss the steps I will take to make it a more acceptable image.
Obviously, the first thing to do will be to lighten the image, but I also want to crop it to reduce some of the dark areas around the flower. I'll be using Adobe Photoshop Lightroom to do both of these tasks. The exposure is easly corrected by using the exposure slider, and in this case I will move it two stops to the "plus" side so that the histogram moves further to the right, increasing the exposure. I can then use the crop tool to reduce the dark area around the flower.
However, I 'm not particularly happy with the result. I feel that the image isn't really striking enough, so I think that I might be able to improve it by rotating it so that the bee is on the side of the image rather than at the bottom. This result probably does improve the composition, but there is a fatal flaw. Can you see it?
Yes, the bee is in a more interesting position, but the stamen in the flower are now drooping horizontally instead of vertically.
Of course, this is pretty much unacceptable, so it's back to the drawing board to see if there is any other answer. I still think that there must be a way of improving the picture.
I finally notice that the image is still rectangular, even after the cropping done earlier.
What if I crop the image to a square format? It will mean shaving a bit off the flower, but I think it might strengthen the composition. Am I right?
I think the final image has the elements that I was looking for: the bee and the stamen are the obvious focus of the photo, and there is an added bonus of golden pollen sprinkled over the petals of the flower.
Although it is no competition winner, it is sharp and colourful and a good representation of the image I had in mind when I squeezed the shutter.
EXIF: Nikon D200; Micro Nikkor 105mm; ISO 100; 1/250 sec; f14
TFF
Subscribe to:
Posts (Atom)